Category: Roofing

The Importance of Proper Roofing

The roof is an important part of your home that protects it from the elements. It can be flat or pitched, vaulted, or domed.

The sheathing is the wooden boards that form the base of your roof. It used to be made up of elongated planks, but today, most roofs are built with plywood sheet sheathing. Click the Roofing Golden to learn more.

Whether you’re building a new home or replacing your existing roof, the type of materials used will significantly impact your roofing costs and the overall look and performance of your house. From traditional asphalt shingles to clay and metal tiles, there are many options available to suit your budget, aesthetic preferences, and environmental concerns.

Historically, roofing was made from layers of sticks, leaves and clay shaped into pitches or sloping surfaces that shed water away from the house. As technology advanced, so did the variety of roofing materials. Asphalt shingles are the most common roof coverings, striking a balance between performance and initial cost. They are durable and readily available, with a warranty period that can exceed 25 years.

More costly but long-lasting options include slate, tile and metal roofing. Clay tiles are fired in kilns to create dense, water-resistant coverings that can either lay flat or follow a wavy pattern. They’re also highly resistant to high winds, making them a good choice for coastal and desert regions.

Slate is a natural material that can add a unique aesthetic to your home. It’s heavy, however, so it requires strong and stable roof structures to support it. The material also needs to be properly maintained to ensure it lasts for a long time.

Both shingles and shakes can provide your home with a rustic look. Shakes are split from the log and shaped, while shingles are sawn into thin wedges for a more even finish. Both are less expensive than other options but do require regular maintenance to keep them in good condition.

Another popular option is built-up roofing (BUR), which consists of layers of felt or ply sheets with bitumen in between them. It’s a common choice for flat or low-slope roof styles and has an excellent Class A fire rating. The downside to BUR is that it can release unpleasant odors during installation and may be more susceptible to damage from foot traffic or hail than some other materials.

Sheet steel roofing is typically galvanised or coated with zinc/aluminium/zinc (Zincalume) or aluminum/zinc/aluminum/zinc (Colorbond). These products are light, durable and offer a good level of energy efficiency. They can be screwed or nailed to timber battens, or clipped into concealed brackets. Most steel roofing contains recycled content and is easily recyclable, so it’s an environmentally responsible choice.
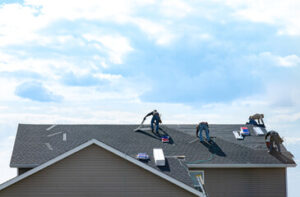
Installation

A roof is an integral component of any structure and acts as its main barrier against weather elements. Its various parts protect against rain, snow, sunlight, extreme temperatures, and wind. Roofing is available in a variety of styles and materials, each with its own strengths and weaknesses. Your contractor will help you select the best roofing material for your home or commercial space based on aesthetic and budgetary concerns. He will also explain the installation process and answer any questions you may have.

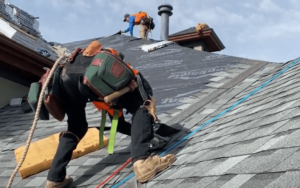
During the actual roofing process, your contractor will begin by laying down a strip of underlayment on the surface. The underlayment is a layer of felt paper or another waterproof material that protects the roof deck from water damage. The contractor will then attach the first row of shingles to the underlayment, overlapping each one by six inches. The next row of shingles will be placed on top, aligned with the previous row and fastened with cap nails every four to six inches. The cap nails will be spread out more towards the middle of the shingle to ensure that it is securely attached. The contractor will repeat this pattern until the ridge of the roof is reached.

Your contractor will then install flashing to prevent leaks in the eaves, roof valleys, and along the hip roof edges. He will also use it around chimneys, wood stove pipes, vents, and other roof penetrations. He will seal these with roofing cement and replace any old caulking as needed.

Re-roofing your building will increase its value and protect it from rain, hail, sun, and extreme temperatures. It will also help you save on energy costs by improving attic ventilation and regulating indoor temperature. To ensure the integrity of your new roof, it is important to hire a qualified and experienced contractor.

Maintenance

Regular inspections and cleaning procedures help maintain the integrity of a roof. This helps prevent leaks, deterioration, and other issues that can decrease the life of the roofing material and lead to expensive repairs. Maintenance procedures include:

Checking for Leaks: This can be done by visually examining the surface of the roof for signs of water damage, including mold and mildew, as well as checking for visible stains on interior ceilings and walls. This can also be done by simulating rain or running a water hose across the roof surface to look for any areas where water may flow down and collect.

Clearing Debris: This includes removing any dirt, leaves, or debris from the roof surface to avoid clogging and protect the roofing materials from premature deterioration. In addition, it is important to regularly check for falling tree limbs that could puncture or otherwise damage the roof. Regularly clearing gutters and downspouts can help ensure they are free from blockages that can impede water flow, as well.

Examining the shingles for excessive wear and tear or any that are outright missing. Look for holes and dents in the shingles as well, as these can allow unwanted creatures to enter the home or business. It is also a good idea to inspect for any cracks or gaps in the flashing, which are the areas where the chimney and vent pipes meet the roof.

Removing Algae and Moss Growth: These organisms can retain moisture, leading to shingle deterioration over time. Removing these growths will help to prolong the life of the shingles.

Inspecting and Repairing Rooftop Equipment Supports: This includes ensuring rooftop HVAC units, solar panels, or other equipment are supported properly to avoid structural damage or a lack of proper air circulation. Coating and Sealant Application: Applying protective coatings and sealants will enhance the durability, weather resistance, and energy efficiency of a roof.

At GR, we have a dedicated roofing team that will perform the necessary maintenance to keep your building or home’s roof in optimal condition. We can provide scheduled inspections, cleaning, and repair services as needed to extend the lifespan of your roofing system. Contact us today to learn more about our programs and schedule your appointment.

Repairs

Whether it’s repairing an isolated leak or replacing a section of shingles, roof repair requires careful assessment and attention to detail. It’s also important to consider the local climate and whether or not the existing shingles are rated for high winds. In some cases, re-roofing may allow property owners to upgrade to a material that improves energy efficiency or increases property value.

To assess what’s needed, the first step is to go up in the attic or crawl space – whatever access point you have that allows you to see the inside of the roof. Look for damp stains, any sign of standing water and the state of the beams.

If you see any areas that need to be repaired or replaced, make them a priority. It’s always better to catch small problems before they become bigger ones that could require full replacement. The same goes for any ventilation issues you may need to address.

Steps in Roof Installation

Roofs are designed to protect buildings against rain, snow, sunlight, and extreme temperatures. They can be constructed of various materials, such as asphalt shingles or metal panels.

Roof Installation

If you decide to tackle your own roof installation, always wear proper safety equipment and be careful when working on steep or high slopes. A fall from the roof could be deadly or cause lifelong injuries. For professional help, contact Montana Roofing Solutions.

It is absolutely essential that the old roof be removed before the new roof is installed. This is one of the first steps in the roofing process and should be done thoroughly without cutting corners. It’s also a great opportunity for the roofing contractor to check on the sheathing and make any repairs that might be necessary.

Most reputable roofing companies are going to recommend that you get a full tear-off of your existing roof before they install the new one. This is because the quality of a new roof depends entirely on the quality of the decking that it’s fastened to, and if the existing decking is damaged in any way, the new roof will be compromised.

During the roof tear off process, your roofing contractor will start at the top peak of the roof and work their way down the entire surface, section by section. They will take off the ridge caps first, working their shovel or fork underneath the shingles and felt paper to pry them loose and let them slide down the roof jacks to be discarded. They will continue this process, removing shingles and felt paper row by row until they reach the joists or decking of the roof where the gutters will be attached.

You will need to prepare your home for the roof installation by removing any outdoor furnishings, covering landscaping with tarps, and keeping pets inside for safety reasons. It’s also a good idea to have a dumpster delivered and set up nearby, as this will keep the debris off of your yard and driveway and make clean-up much easier. This will be especially helpful if you choose to have your roof made from asphalt shingles, as these can generate quite a bit of waste.

Underlayment

Roof underlayment provides a secondary layer of protection for your home. Typically made from asphalt-saturated felt or synthetic materials, it helps prevent water during a rain event from infiltrating your home. It also acts as a vapor barrier, which prevents moisture from migrating into your home’s structure. There are a few different types of roof underlayment, each of which are best suited for specific roofing materials and weather conditions. It’s important to consult with a roofing professional before choosing an underlayment for your roof, as using the wrong type can cause significant problems.

Felt underlayment is traditionally the most common underlayment material. It is typically made from a combination of organic paper or mat and completely saturated with asphalt. It is available in a range of thicknesses, from No. 15 felt, which is suitable for lightweight projects, to No. 30 felt, which is more durable and fits a wider range of applications. It can be difficult to install, though, especially in areas with steep slopes. It is also susceptible to tearing, so it must be properly installed.

Synthetic underlayment is a modern roofing alternative to felt. It’s typically made from a polymer blend, which is designed to protect against the elements. It is also resistant to fungal growth and is wrinkle-free. It is usually not as cost-effective as felt underlayment, but it has some advantages. It is not as susceptible to tearing, but it does require proper installation to avoid moisture issues. It’s also not as water-resistant as No. 30 felt, so it is not recommended for use in snowy climates.

As with all roof installations, a good roofing contractor will carefully prepare the roof deck before installing the underlayment. They will sweep the sheathing clean, making sure there are no debris or protrusions that could interfere with the underlayment’s ability to lay flat. Then, they will begin installing the underlayment starting at the lowest edge of the roof, such as the eaves or valleys.

Shingles

When the underlayment is in place, it’s time to start laying shingles. Most pros begin at the center of the roof and work both left and right toward the eave and rake edges. Check the shingle manufacturer’s recommendations for specific details. It is usually necessary to apply self-adhesive waterproof underlayment (also called an “ice barrier”) to guard against water seepage that can occur if windblown heavy rain or snow forces water up and under shingles not properly secured to the roof sheathing. This material adheres tightly to bare roof sheathing and seals around nails driven through it. It is available at most roofing supply companies and some home centers.

When laying the first full course of shingles, lay them in a pattern that allows about a tab width of overhang at the sides and leading edge of each row. Nail each shingle down with 4-6 nails per shingle, depending on the weather conditions in your area.

The shingle installation process should include metal flashing to protect the areas around chimneys, vents and other roof penetrations as well as to help the shingles resist damage from wind-driven rain. Ice and water protection membranes can also be applied to the underside of shingle sections that meet walls or other surfaces, such as dormers or skylights.

Calculate how many shingles you’ll need by measuring the length and width of each independent roof section, then multiplying the results by 100 to get the total area of your roof in square feet. You may then divide the number of shingles required by three to get a rough estimate of the number of bundles to purchase. When purchasing the shingles, be sure to pick up a few starter strip shingles (the long rectangular shingles with a self-sealing adhesive strip that gets installed at the eave and rake edge of your roof) as well.

Tiles

Tile roofs come in a variety of shapes, sizes, colors and materials, allowing homeowners to personalize their home. Tile roofing is also durable and resists extreme weather conditions, such as heavy rainfall, preventing leaks.

There are several types of tile roofs, which affects the total cost. Clay tiles are popular in tropical regions and require regular maintenance. They are heavy and can be difficult to lift, so they may need additional reinforcements if they become damaged or cracked.

Concrete tile, on the other hand, is more affordable and requires less maintenance. It has a Class A fire rating and resists mold buildup, insect damage, and water penetration. It is not as aesthetically pleasing as clay tiles, but it can still enhance the look of any structure.

Other popular options include slate tiles, known for their natural beauty, and kawara tiles, which are unique J-shaped roof tiles often ending in a traditional Japanese decoration or symbol. These are the roofs of over 50% of Japan’s temples and shrines, as well as a number of private homes.

Besides the main tiles, a roof will need ridge tiles where two sides meet, apex or verge tiles where three sides come to a point, and hip ends where the ridges end. It will also need caps and cowls to protect vents and other openings on the roof.

A homeowner may also choose a curved roof, which is usually more expensive and requires an expert to install. Curved tiles are also more resistant to mold buildup and rot, making them a good choice for areas with high humidity.

Flashing

When it comes to your roof, flashing is a key piece of the puzzle that helps prevent water leaks. Without it, rain and snow could seep beneath shingles and other roofing materials. This can lead to rot, mildew, and pest infestation. Flashing is a flexible sheet of metal that a roofing professional installs to protect the most vulnerable parts of your roof.

A professional roofer will place flashing around areas where there is a potential for leaks, such as chimneys, joints, and other protrusions. It also protects areas of the roof where it meets walls or other vertical surfaces. Flashing is available in a variety of materials, including galvanized steel, copper, and aluminum. Each type of flashing offers its own unique set of advantages.

Typically, the flashing is installed with a caulking or sealant that provides extra waterproof protection. It is also secured with nails. Depending on the roof, flashing may be exposed or concealed.

In some cases, a roofer will need to use two pieces of flashing. This is often the case with chimneys, which require base and counter flashing. This is done to ensure that rain meets a flashing surface that directs it downwards, rather than leaking into the structure of the house or chimney itself.

Another example of this is the flashing around a plumbing vent. The roofer will place the base flashing down over the pipe, then shingle up to it. They will then place a piece of counter flashing above the base flashing, to ensure that water doesn’t slip underneath the shingles and cause damage.

Navigation